Hello Krafters,
Today over at Practical Scrappers, we are having "sew" much fun today! Yep, you guessed it! It is all about sewing notations today! Pop over by Practical Scrappers to see the DT's creations!
For my project, I used the Imagine and a piece of G45's A Ladies Diary for the pattern paper. The measuring tape and the stitching came from the Heirloom stack by DCWV. I stamped the dress form with Momento (brown) ink. I added a button to it. To continue on with the theme of sewing, I added a few charms I had in my stash. I also decided to use a stick pin to add a finished look.
I hope you enjoyed today's project! Thank you all for stopping by! Krafthead~
Products:
Imagine
Heirloom DCWV
G45 A ladies Diary
Gold Mixatives
Button
Lace
Stamp
Ink
Tag Punch
Charm
Monday, August 27, 2012
Monday, August 20, 2012
Practical Scrappers DT Project: Notebook Doodles
Hi Krafters!
Can you believe school is starting soon! Where did the
summer go? I know it will be one to remember as the heat has been off the
charts! Not complaining though~
Today I am sharing my project for Practical Scrappers! I had so
much fun doing this one J
We had to make a school related project!
Go over and check out the
inspiration! Trust me, you will NOT be disappointed!
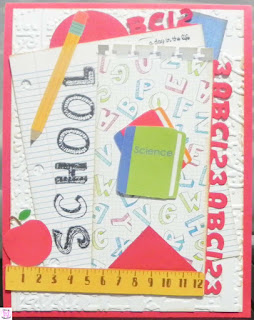
For this project, I used the Notebook Doodles Imagine cartridge. I *heart* that cartridge! Anywho, I printed the notebook page pattern and the pattern with the letters. The printed papers are layered on a piece of white cardstock that was embossed using the Collage Sizzix folder. The“ABC123” border was punched with a punch by EK Success. I also added some basic shapes to make a more elementary type design (hey my girls are in elementary school LOL).
The embellishments were fussy cut from the Me & My Big
Idea Elementary stack. To finish off the design, I stamped “school” and “a day
in the life” from some stamps I have in my stash. I almost forgot, the printed
paper looked plain so I punched the notebook edge from another punch by EK
Success J
I hope you enjoyed today’s project! Don’t forget to pop over
to Practical Scrappers for
more inspiration!
*I also wanted to say thank you to all of my new and existing
followers! If I am not following you, please let me know so I can follow you as
well! Thank you J
Products:
Notebook Doodles
Collage Sizzix Embossing Folder
EK Success Punches
Me & My Big Idea Paper Stack
Tea Dye Distress Ink
Sunday, August 19, 2012
SOC DT Project: Try, Try & Try Again-You Go Girl!
Hello Everyone!
My daughter is vertically challenged and I would have to help her up the ladder so she can play on the slide. This particular day we were at the playground she was determined to do it by herself. I was so happy I could capture her victory (even though the pictures are not the greatest)! Looking at her that day made me realize life is full of risks. She could have fallen down and hurt herself. That was my worry, but obviously not hers. That was inspiration for this project!
Crafting can be risky too. You can have a project failure or a project success. I used wood grain paper and different pattern papers which is something that would have frightened me a year ago. Honestly, I had to try, try, and try again before I was satisfied with this layout. Considering this layout is not “my style” I would put this in the success pile!
The papers came from different stacks by DCWV. I hand cut the different pattern papers to mimic the waves in the slide. The doily is from the WRMK Lucky 8 Tattered Doily Punch. I cut the slide from the Playground Equipment digital cartridge on Cricut Craft Room which doubled as the journaling spot. The title was cut on the Silhouette. The flowers are I Am Roses and the butterflies were made from a punch by Martha Stewart.
What crafting risks have you taken or do you want to take? Is it a new technique or papers you usually don’t use? Whatever your risk is, remember to try, try, and try again….you will succeed! Stop by Scraps of Color for more project inspiration! Thanks for stopping by, Krafthead~
Friday, August 17, 2012
BossKut DT Project
Hello Krafters!
Krafthead here to share two cards using the newly released Loopy
Doily! This card can be massed produced in the matter of minutes! For the
base of the card, I made a shadow (4.2”) of the doily and welded it to a
rectangle which measures 4.25”x5.5”.
Once the base is folded in half, it will be a standard A2 sized card
(4.2”).
The gold card, the Loopy
Doily’s top layer was embossed with gold embossing powder to match the
pattern paper. I also embossed the sentiment. The pearls were colored with the
Golden Yellow Copic Marker (can be purchased at BossKut.com). The butterflies were punched
in the same pattern paper on the base of the card. I added pearls to the
center.
For the yellow and white card, in conjunction with the Loopy
Doily, I used the newly released RufflesPKButterfly.
The butterfly is mounted on the center cut which was dry embossed to add
texture. I decided not to add a sentiment to this one. To finish it off, I
added pearls to the RufflesPKButterfly
and a pearl flourish. I also added pearls to the base of the card to pull
everything together.
That is it for today! I really hope you enjoyed today’s
cards. Don’t forget to pop on over to BossKut.com
for ALL of the files, supplies and to check out other projects from the
talented DT! Thanks for stopping by, Krafthead~
**Please note, I
suggest lining the shadow to the top layer to make sure the loops line up
correctly before applying adhesive!
Files:
Wednesday, August 15, 2012
Announcement!!
Hi Krafters,
Thank you so much for following me! Until next time, Krafthead~
I made a vow to try to keep my blog updated at least three
times a week. I like to upload new projects for inspiration. After much
consideration, I have made the decision to take some time off. I am going
through a difficult time right now and I do not foresee much crafting happening
(for a short time I hope). However, I do have DT projects coming up J Until I get a definitive answer on my dad’s
condition, I will be sharing some various projects until I can create again!
I hope to be able to visit some blogs from time to time!
Thank you so much for following me! Until next time, Krafthead~
Monday, August 13, 2012
Practical Scrappers DT Project: Wild Child
Hi Krafters,
Today, I am sharing another Practical Scrappers design team
project. The theme today is using notebook paper, ledger, stickers or so on!
Make sure to stop by the blog to see some FANTASTIC projects!
I was looking through some photos and found this. I began to
reminisce. My daughter loved to get her hair washed, but hated to get it
combed. This is her trying to run away from getting her hair done. She was too
funny! She was two years old in this photo.
I have really been into the whole Polaroid thing. I fussy cut this one from the paper stack! I think it reminds me of my grandmother's old camera! I can remember when that was so cool. You can get your photos right on the spot. I loved seeing the image emerge. I can even remember the smell.
I hope you enjoyed today’s project! Thank you so much for
stopping by, Krafthead~
Products:
Cameo-title
7 Gypsies
DCWV Heirloom
Core’dinations-solid cardstock
Webster’s Pages Bloomers
Cherry Lynn Doily
Martha Stewart
Monarch Butterfly
TH Tissue Tape & Tickets
Recollections Bling
Collage Stamp
Poppy Lane Die-bird cage
EK Success Punch
Fiskars Punch
Walnut Stain Distress Stain
I Am Roses
Friday, August 10, 2012
Mr. Fix It
TGIF Krafters!
Today I am sharing a quick card I made for my DH's friend. He is a jack of all trades and master of all. He has helped us tremendously over the years during our crash course in homeownership! Anywho, I just wanted to share :) Thanks for stopping by, Krafthead~
Products:
DCWV Guy Stack
Diamond Embossing Folder
Making Memories Metal Sheet
Wednesday, August 8, 2012
Can I Get A What What?? Winner Ova Here!
Happy Wednesday Krafters!
Did you know Kelli had a give-a-way
for reaching 30 followers?!? Well if you didn’t you missed out! One awesome
follower was going to receive a great RAK. She was so generous! She gave each person
that left love on her blog a RAK and I was one of them J WOOT! Today I am sharing a
RAK/winnings! Girlfriend did her thang too!
As you can see, there was a lot in this package. Paula Deen paper and tags,
stamps, ink, lace, doilies, pearls, butterflies (paper and acrylic), chipboard
album, trim, vellum sayings and those beautiful vintage buttons (that I used on
Monday’s project) were in there! I know I am going to have a lot of fun playing
with all of the goodies!!
She is now reaching 50 followers (hint, hint) so stay tuned.
Also her beautiful Passion Stamps are now available. Visit her blog for more information! Thank you
SO much Kelli for your generosity! Much love Sis!
Thank you all for stopping by, Krafthead~
Monday, August 6, 2012
Practical Scrappers DT Project: Tags, Tags and More Tags!!
Hi Krafters!
Today over at Practical
Scrappers, we are sharing projects utilizing tags! We all love tags! We use
them as journaling spots, embellishments or we alter them! They can be used so
many ways! I decided to use mini tags to embellish this simple card! Pop over to Practical Scrappers for more
inspiration on using tags!! Krafthead~
Thank you Kelli (My Sister) for the beautiful vintage button! It was perfect for this project :)
Friday, August 3, 2012
It's Sew Your Birthday!
Hello Krafters!
I am in the process of reorganizing my craft space (really haven't started yet...grrrr). However,
I still wanted to blog on my regular day. I decided to share a project I shared
on my other blog which features the BossKut Gazelle! So you may or may not have seen this. Enjoy! Krafthead~
If you would like to know how this was made, click here!
Wednesday, August 1, 2012
Bow Wow!
Hi Krafters!
Today I am sharing some simple ATCs for a swap I participated
in over at sb.com. The theme I chose was the dog/cat category. I had a lot of
fun making these!
The dog houses and bones were cut from the Create a Critter
cartridge. I fussy cut the hydrant from the Pets Stack by DCWV. The fence is
Martha Stewart punch. I took some faux fur (an old baby blanket) to emulate a
dog sleeping in the dog house. I added some bling to be the dog’s collar.
Short post today! I hope you enjoyed today’s project. Thanks
for stopping by, Krafthead~
Subscribe to:
Posts (Atom)


